In this video, I'm going to
show you how to self pop your whole back for instant pain
relief. Stay tuned. Hey, everyone. Dr. Rowe coming
to you from SpineCare in Saint Joseph, Michigan. In this
video, I'm going to go over mobility exercises that may end
with a satisfying self pop or release pretty much throughout
the whole back. As a side note, these are not chiropractic
adjustments. They do not replace chiropractic
adjustments. These are just general mobility exercises that
are geared towards giving quick pain relief, tightness relief,
and improving range of motion. So, with that being said, let's
get started and self release the whole back. Right now, one
of the hardest spots to get to self release or self pop is at
the base of the neck into the upper back. So, here's a neat
trick to be able to help with that. I'm going to be using a
hand drying towel. Just roll it up if you don't have one. You
can also use a water bottle, even a can of soup but we just
need to lay flat.
You can do this one in bed or on the
floor. You want the towel to be over the curve of the neck.
Allow everything to relax. You want to relax as much as
possible because this will make this extra sides more
effective. Let's say that I have a lot on my left side.
Whatever side that you're focusing on, take that side's
arm, bend the elbow at 90°, lift up on your body like this
and then slide the arm towards the other direction as much as
you can.
From there, you can lower your body. What this will
do is relax a muscle known as the upper trapezius. Let's take
the opposite sides, hand grab on the outside of the head
right here and just simply pull that ear down towards the
opposite side shoulder. When you do this, you're going to
feel a great stretch. only go to your comfort level but if
you do have a locked up segment into that area, you'll probably
feel a pop or self release but do not try to force this. only
go to a comfortable stretch. Once you get to a comfortable
stretch, hold this one for about 15 seconds. You just
relax from there. Try to drive the arm over even further and
then bring the ear down towards the shoulder. You can do this
up to five repetitions and again, if it's ready to go, it
will probably pop. So, here's how we can take that last
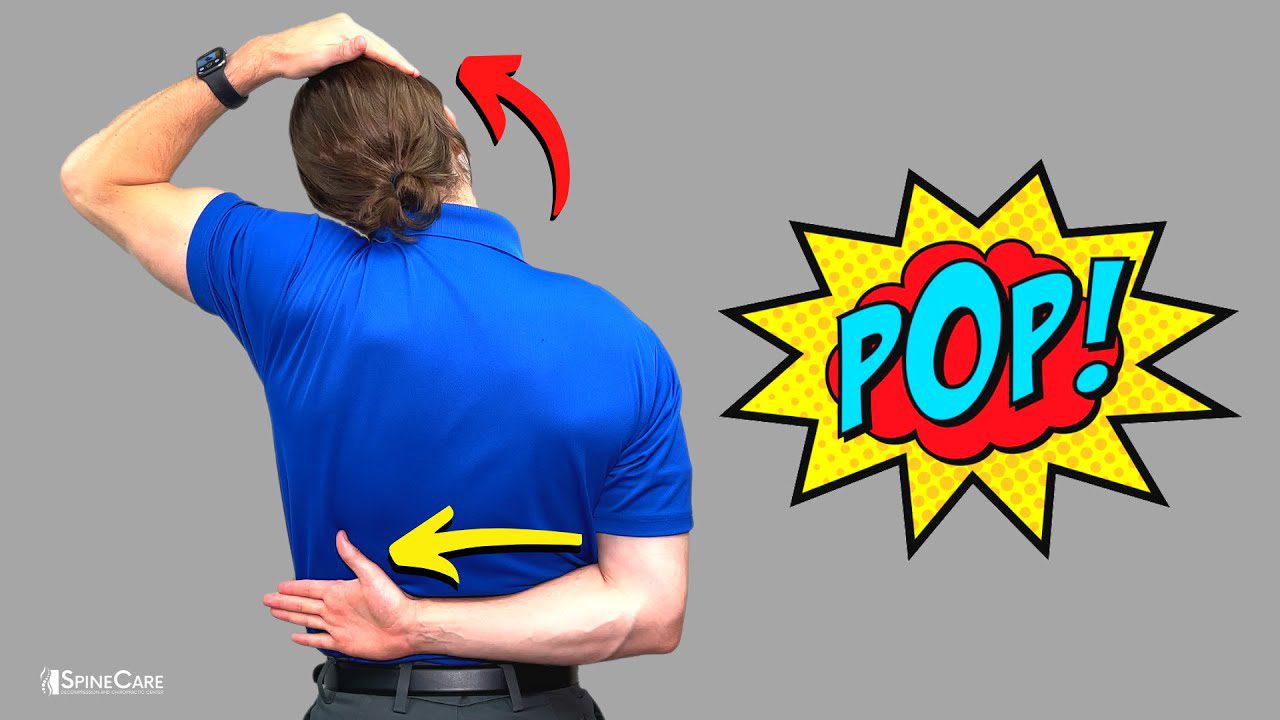
exercise and turn it into the anywhere stretch. This one is
perfect to do at work because you can do it standing.
What
I'm going to do, stand with very good upright posture.
Whatever side that we're focusing on in this case is
going to be my right. I'm going to take that arm, bend the
elbow at 90°, and then just slide it across the lower back
like this as far as I can. This again will help relax this
muscle right here, the upper trapezius. What I'm going to do
from there is take the other hand, place it on the head just
like this.
And then I'm going to take the opposite sides ear
towards that shoulder so my left ear goes down towards my
left shoulder as much as I can and again, if this feels like
it's locked up, you'll probably feel a sudden pop or release
into that area of the upper back into the base of the neck.
Hold this comfortably for about ten to 15 seconds. From there,
just relax and then on the next repetition, try to reach over
even further and bring that ear down even further to help open
it up even more but you just want to do this one nice and
comfortably for about complete repetitions and whatever you do
on one side, always switch to the other to keep them both in
balance when it comes to the upper and middle backs, the
thoracic region, you want to focus on backward extension to
get it to open up. For this exercise. You can use one of
several things. The first being a one liter water bottle. You
want one that's a little bit more thick and it's a little
bit longer too. You can use a can of soup or my personal
favorite, take two tennis balls, place them in a sock.
What you want to do is just pull them out like that.
Twist
it like that, tie it and at that point, you have a great
tool because your spine is going to be able to sit in here
and it's a little bit more comfortable. So, I'm going to
be using this right here but if you do use a water bottle or a
can of soup, make sure to use a towel and place over it like
this for extra comfort. So, to get into position, let's start
off on the floor and I'm going to just put that tennis ball or
if you're using the soup can or the water bottle, place it over
the level that you feel is the most tight and a achy. So, once
we get into that spot, let's take our hands just like this
and I'm going to place my hands on the back of my head. I'm
going to wing the elbows down towards the floor as much as I
can.
A simple variation of this is just to bring the elbows
down as much as you can and then lift your butt up into a
bridge like position. What this is going to do is it's going to
put a lot more pressure your body weight into the area over
the tennis balls or the soup can and you'll probably feel it
just self release but you can roll up and down from the upper
back all the way down to the middle back but do not go over
the lower back because that could cause irritation and when
you do this, you might feel some snaps. you might feel some
pops and clicks but just do this nice and slowly up and
down completely for about three to five repetitions. If you
find that one spot just is not wanting to release and it's
just really painful or tight and achy. Let's stop over that
area.
What I'm going to do from there is keep my butt on the
floor. I'm going to wing my elbows back as much as I can
and I'm also going to draw my head like this. This will put
the back into more extension and you should feel a great
stretch over the tennis balls or the soup can try to bring
that down as much as you can. This will help open it up and
hopefully get that self pot that you're looking for. You
can also do a variation where you bring the head down like
this.
Put the arms up straight like this and then just lower
them down as much as you can but if you still feel like it's
not wanting to pop, just simply lower the hands down quickly
like that into a passive stretch and you might find that
that is enough to get it to self release. You can also do
that method like this, bringing the head down and then winging
the elbows back but don't try to force it only go with a
gentle stretch and if it's ready to go, it will go. So,
here is a two-part method that's really going to help
open the upper and middle backs. pretty much anywhere You
can do this when standing and we just need a door frame. In
the first part. Let's do a simple door lean. So, I'm going
to put my feet together. I'm going to start in what I call
the Y position. So, my hands and arms just go up like this
towards the the door frame in AY position.
I'm going to then
just lean into the doorway like this and it's going to feel
like a great stretch. You'll feel it into the chest. You'll
feel it in between the shoulder blades. Also lean forward as
much as you can. Once we hit a very comfortable stretch, Hold
this one for about 15 seconds. When you do this stretch, you
might feel an immediate pop or release. So, what we want to do
from there is then go into what I call the field goal position.
So, I'm just going to do the same thing. Lean forward into
it. It's going hit the muscles and the joints in the back just
a little bit differently. So, again, you might get that to
finally self release but hold this one for about 15 seconds,
relax and then go into what I call the W.
So, just lower the
elbows down like this and then repeat whatever one you feel
hits it a little bit more or you feel like it's going to
help self release the back, throw some more repetitions in
there but if you still feel like it's locked up and it just
does not want to release this is how we can take it to the
next level. In the second part, let's say that I have a lot
going on to my left, it feels very locked up. What I'm going
to do is get into a scissors lunge stance just like this.
I'm going to take that sides, arm, bend the elbow at 90°. The
arm is going to go flush against the door frame. I'm
going to then lunge into it like this and again, you're
going to feel a great stretch. Really try to focus on lunging
forward as much as you can. From there, what I'm going to
do is I'm going to then turn my body in the other direction.
What this will do is put very good rotation into the upper
back across those ribs also.
So you might get that to finally
self pop but really try to focus on rotating the opposite
direction as much as you can. Once you hit a very comfortable
stretch, hold this one for about 15 seconds. From there,
relax, take a breather and then on the next repetition, drive
forward even more to get a better stretch and then really
try to turn the opposite direction again and hold this
one for 15 seconds up to five repetitions and whatever you do
on one side, always switch to the other to keep them both in
balance when it comes to self releasing or self popping the
lower back. I find that the corkscrew exercise is the
easiest and most effective.
We just need to lie flat on our
back in bed or on the floor. I'm going to show this in two
variations. The first variation, I'm just going to
raise my legs up like this. Knees are going to be at 90°
and I'm just going to grab onto the side of the floor or the
bed and then just rotate my knees towards one side as far
as I can. Go down as far as you can and once we hit that
position.
Hold this one for about 5 seconds. From there,
slowly come back up and then go towards the other side as far
as you can. When you do this, you're going to put a lot of
good movement into the lower back. So, you want to do this
one for about five to ten repetitions. You're going to
notice that each time you do it, you have a little bit more
range of motion and this is going to help just take a lot
of tightness out of the back and you might find that with
one certain repetition that lower back will finally just
self release or self popping. It might be immediate but you
just want to do this one nice and slowly with each
repetition.
Again, try to go down a little bit further with
it. For the next one. What I'm going to do is whatever side
that we're focusing on, let's take the other side. So, in
this case, I want to do my right. I'm going to straighten
my left leg and I'm going to go towards the edge of a bed. What
I'm going to do from there is put my leg at 90°. Again, I'm
going to take the hand closest to the edge of the bed right
here. Grab on the outside of the bent knee. So my left hand
is grabbing on the outside of my right knee. I'm going to
just use my other hand to stabilize by grabbing onto the
bed like this. From there, what I'm going to do is I'm going to
lower that knee down as much as I can and you're going to feel
a great stretch into the lower back.
Really focus on lowering
that down as much as you can. From there, what I'm going to
do is straighten the arm on the other side and then turn my
head and my upper body all the way in the opposite direction.
This will give us that corkscrew of and this is a very
deep stretch into the lower back and you'll probably feel
it self release, click or pop. Hold this position for about 10
seconds. From there, you're just going to relax, take a
breather, and then repeat this one up to five times with each
repetition. Try to drive this knee further downwards and
rotate the upper body and head in the opposite direction and
when you're done on one side, always switch to the other to
keep them in balance. In this part, let's focus a little bit
more across the Pm into the SI joints or those sacroiliac
joints.
I'm also going to be using my two tennis balls in a
sock If you don't have this, you can also use a can of soup
with a large towel over it or you can use a foam roller. What
I'm going to do is go next to a door or a wall and place my
feet against that door with my knees bent in 90°. I find that
this is easier to do with shoes on because you'll have a little
more grip. Let's take our tennis balls right here and I'm
going to place it pretty much at the top of the cheeks or
just a little bit below my belt line and I put it right over
the center and then I'm just going to allow my upper body
weight to just rest downwards onto that. You can put your
hands behind your head like this or you can just put them
to the side whatever works and is little bit more comfortable
for you. What I like to do first is just a basic pelvic
tilt.
So, to help out, let's put our hands on our hips and
then just rock it forward and backwards. This will cause the
area of lower back, the pelvis to roll over those balls and it
usually pretty good. Just do nice, slow controlled motions
up and down and sometimes if that SI joint is locked up with
this motion, you might get an immediate pop with it but I
like to do this for about ten to fifteen times up and down
and from there, I'm going to go side to side, just rock side to
side and you can control the amount of pressure by just
pushing your body weight into the balls and from there, I
just do a hula hoop motion just nice and slow and you can do a
counter clock wise and then switch to clockwise to hit it
at a little bit of a different angle. If it still feels like
it's locked up, Let's do this. Let's take our feet off the
wall just like this. Put our legs together and then rock
them from side to side very gently and this right here
usually gets those SI joints to open up so you might get a
quick pop and I just like to do this one nice and slow from
side to side for about five to ten repetitions.
From here, you
can also switch the ball over different locations. Let's say
that you have a little bit more off to the right and you can do
this exercise again and target the spots that needed just a
little bit better but it's just an easy way to go in there. Put
some good motion across the pelvis and hopefully get a nice
satisfying snap pop or release into the pelvis and SI joints.
So, here is a really easy way to get the SI or sacroiliac
joints to self pop or self release pretty much anywhere
you can do this one right at work.
We just need to be in a a
chair, I'm going to start off with very good upright posture.
This is an isometric exercise so it's not going to feel like
you're moving that much but it's actually going to work a
lot in the lower back and pelvis. start off with the
knees right here in line with the hips in a nice straight
line. From there, what I'm going to do is take my hands,
place them on the outside of the knees. I'm going to drive
my knees outward but I'm going to resist with my hands.
So,
you want to do this one and try to really press into the hands
as much as you can for seconds. From there, you're going to
relax, take a breather, and then repeat this up to five
times. Here's the knee part. So, let's take our hands, put
them together, put them in between the knees, and do the
opposite drive inwards and I don't know if you just heard it
over the microphone but I got a very good release into my right
SI joint. so, I just bring the knees in again just like this
and do the opposite exercise. So, I'm going inwards holding
this one for 5 seconds, relaxing and then repeating up
to five times. If this does bug your hands, you can put a small
pillow or towel in between your legs instead but this is just a
very easy way to really open up those SI joints and you'll
probably get that knuckle crack sensation that you're looking
for.
If you like the video and it helped, please show us your
support by giving this video like and maybe subscribing to
our channel too. If you have any comments or questions,
please leave them below. I'll get back to you as soon as I
can. Thank you for watching..